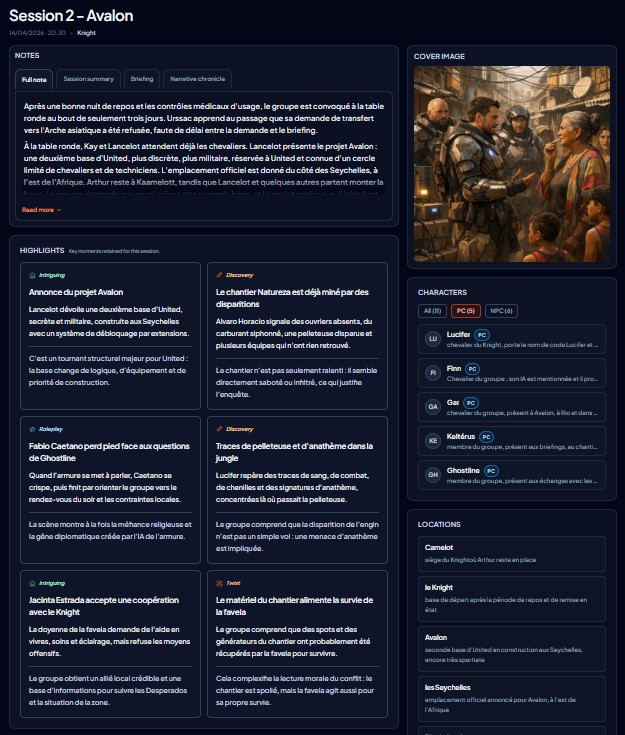
The group opens the session in Port-aux-Brumes, in the low hall of the Abbey of Tides. Abbess Seraphine Talvern receives them with Captain Bren Morcant, two water-damaged ledgers, and a double emergency: several shipments of consecrated beacon oil have vanished between the port and Brumeterre, and the Drowned Beacon, which keeps the northern channels safe, has been dark for three tides. She is not only asking them to recover the missing barrels. She also wants the Tide Key back, a bronze artifact that unlocks the beacon mechanism and the adjoining lower archives. Seraphine insists on one point: the Salt Guild claims that the people of Brumeterre are deliberately sabotaging the routes, but she does not trust the Guild enough to leave the key in its hands.
Bren then spreads out the channel chart and explains that the markers are out of alignment, the posts are rotting, and that a group led by the mercenary Ser Dagan Krell left the port an hour before them carrying a Guild warrant. The party boards a light barge, then finishes the crossing on foot along the Black Reed Causeway with Neral the ferryman. Rook Fen immediately spots more boot marks than expected, as if Krell’s men had already made several return trips. Mira Valcerne also feels an uneven magical pulse running through the shore lanterns: the protection still exists, but it is being fed in bursts and will likely fail with the next heavy tide.
Brumeterre looks nothing like a raider camp. The village is tired and salt-beaten, with creaking walkways and stilt houses linked by makeshift lamps. Ysilde Marréca receives the group without warmth but without panic. She recognizes the abbey seal at once, then asks whether the adventurers have come to reclaim the oil or to relight the beacon. Brother Caelan almost immediately stops to help a feverish child, while Aela Rochefer notices that several village lanterns are burning the same amber oil reported missing from the convoys. Corwin Venn avoids turning the arrival into a raid and secures permission for the group to speak inside the common hall.
Ysilde explains that the Salt Guild stopped funding the upkeep of the posts, lamps, and tide bells months ago while continuing to demand passage taxes. When the first haunted fogs started rising again, Brumeterre took what it could from the stranded convoys to stop the drowned dead from entering the houses. She insists that no one in the village has the Tide Key. The archivist Orlin, however, may know where it was hidden when the beacon began to flood. The group therefore descends into the submerged scriptorium, a lower room where the shelves have been hoisted to the ceiling and people move between tables raised on bricks.
Orlin shows them the beacon’s Bronze Astrolabe, too incomplete to open the tide lock on its own, along with maintenance ledgers eaten through by salt. With Comprehend Languages, Mira deciphers old annotations indicating that the Tide Key was moved to the upper lantern after a crack opened in the lower chamber. The recent ledgers reveal something else as well: the Guild did receive Brumeterre’s maintenance funds, but the payments were redirected to private ships and armed escorts. That is the moment the session turns. The group realizes the matter is not simply abbey versus smugglers, but an entire village trapped inside a deliberate system of extraction.
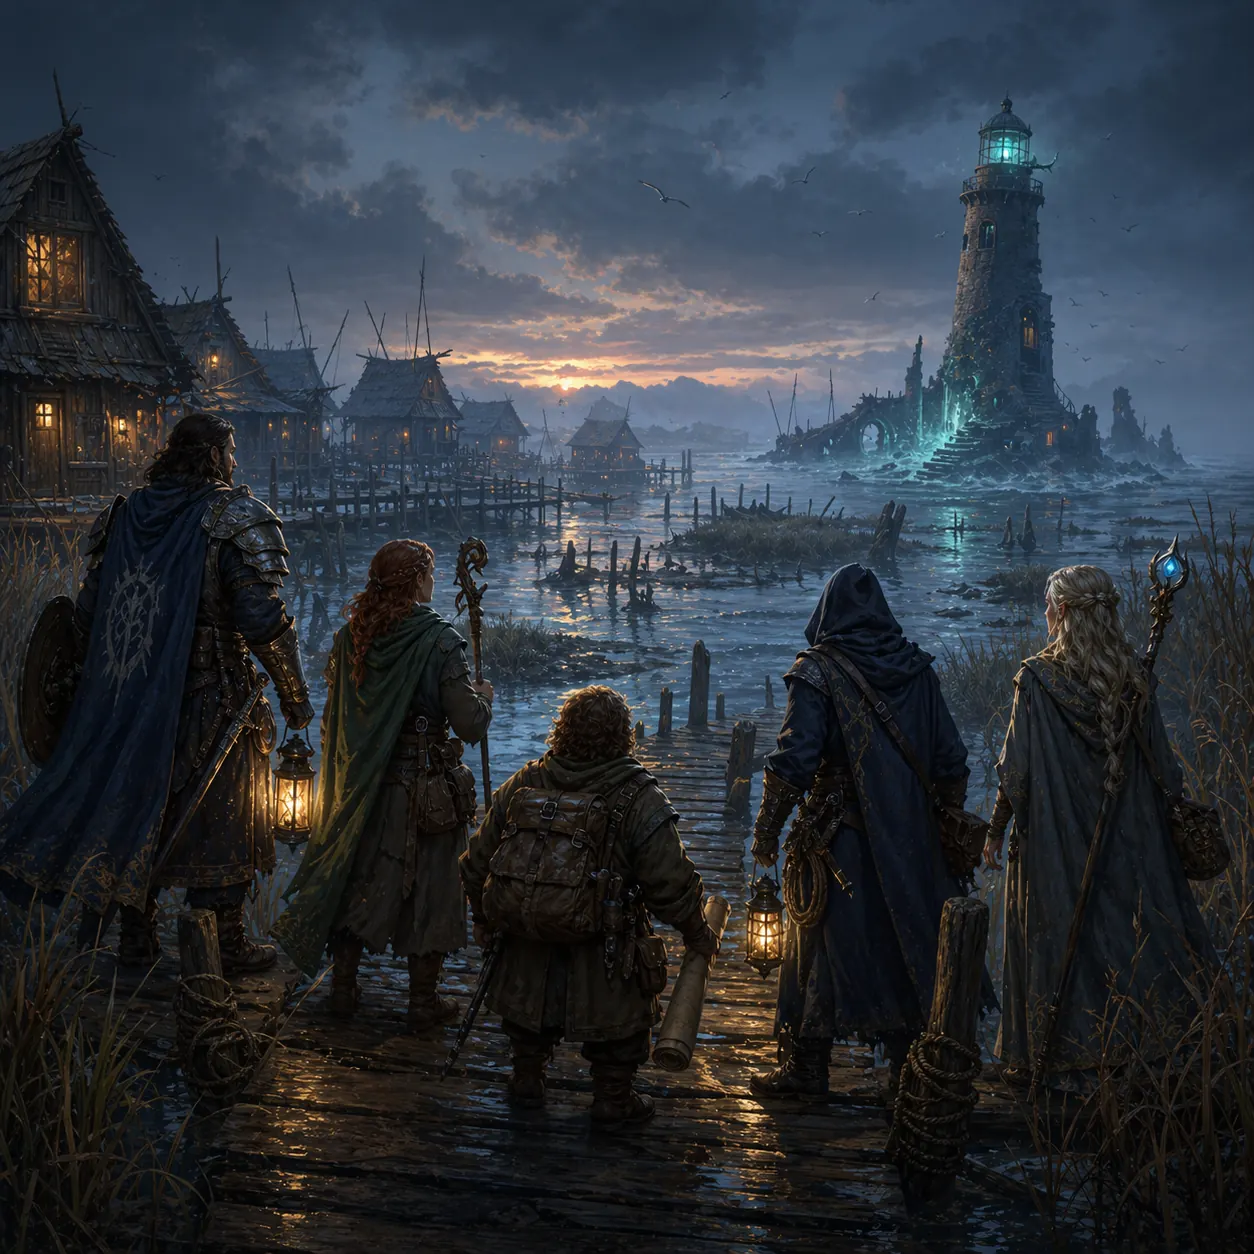
As soon as they come back up, Neral warns them that he saw Ser Dagan Krell’s men taking the old stilt path toward the Drowned Beacon. Ysilde refuses to let them force their way through the village, but she agrees to hand the group the Channel Chart and two warded lanterns if the adventurers promise to relight the beacon before the next full tide. Rook then leads the approach through the reeds, choosing the planks that still hold and the mudbanks that will not collapse at the first step. More than once, Aela has to brace a mooring chain so the others can cross, while Corwin watches their back trail and confirms the same iron-shod prints they saw on the causeway. Mira keeps Detect Magic running during the march and follows a thin turquoise current leading straight toward the top of the tower.
The Drowned Beacon is half broken, its ground floor already swallowed by the tide and its inner spiral staircase missing several steps. The old bells ring without wind, out of sequence, as if the building were still replaying alarms from decades ago. Mira spots a runic lock in the lens chamber, and Aela keeps the wheel braced while Rook fits the Bronze Astrolabe into its socket. An inscription in an old coastal dialect explains that only shared light can reopen the mechanism. The group lines up Brumeterre’s two lanterns with the Consecrated Beacon Oil, and the Tide Key rises out of a flooded niche together with a packet of waxed papers: copies of the port accounts and written orders from the Guild suspending maintenance on the beacon while later blaming Brumeterre for the result.
The group only has a few seconds before Ser Dagan Krell and three armed men arrive on the outer gallery. Krell claims to be acting in the name of coastal security and demands the key, the ledgers, and even the Channel Chart. Corwin tries to buy time by reading the beginning of the recovered accounts out loud, but Krell chooses intimidation. The fight breaks out on rain-slick boards while the water keeps climbing with every exchange. Mira uses Misty Step to cross a collapsed section and reach the lantern, Brother Caelan sustains a protective prayer to stop the rising tide from snuffing out the newborn beam, and Rook cuts a side rope that isolates two mercenaries from the rest. Aela eventually disarms Krell without throwing him into the water, which leaves the scene an off-ramp.
Once Krell is on the ground, Ysilde and Neral reach the beacon with several villagers who came at the signal. The group then chooses not to hand the Tide Key straight to the Guild, or even to let it go back to the port without conditions. The adventurers first restart the beacon mechanism with the Consecrated Beacon Oil, sending a clean beam back across the channels and calming the drowned silhouettes circling offshore. After that, they entrust the key temporarily to Ysilde and Orlin on the promise that it will be shown to Abbess Seraphine in person together with copied ledgers. Bren will receive the evidence and safe passage, but not the right to erase what Brumeterre had to do in order to survive.
The session ends with light returning to the fog, villagers stepping back onto the walkways, and Ser Dagan Krell withdrawing while warning that the Guild will not let the insult stand. The group leaves behind a fragile but chosen compromise: the beacon works again, Brumeterre keeps enough to hold until the next negotiation, and the abbey will now have to decide whether it protects the village or simply ratifies the port’s version of events.